SAFETY FIRST: Outdoor Education is as safe as necessary. Please read the Canadian Paediatric Society's post here: Position Statement on Outdoor Risky Play


MEASUREMENT
One touch of nature makes the whole world kin.
- Shakespeare
Measurement
When I was a classroom teacher I used a text book inside the classroom to teach measurement. One question asked students to calculate the area and perimeter of Ms. Smith's garden. Myself and some students could picture the garden; others could draw the garden; sometimes I even had students act out a question. With my new outdoor education knowledge I laugh at myself thinking the text book was best pedagogy. TAKE THE STUDENTS OUTSIDE now rings in my head. So simple, but not thought of. Teaching measurement outside speaks to the visual, logical, kinesthetic, and naturalistic learners while giving all students physical, social, academic, and positive mental health! The lessons below can be adapted to your grade level and outcomes.
Volume and Capacity
The students enjoy the thrill of maybe the container will overflow in this lesson. I do the experiment twice so I can have the water overflow on the second try.
Primary
-
M01.03 Compare the capacity of two given objects and explain the comparison using words such as holds less, holds more, or holds almost the same.
-
M01.04 Compare the volume of two given objects and explain the comparison using words such as bigger, smaller, or almost the same.
This is a fun lesson to do outside because you can spill water and it won't matter! SAFETY tip: If lesson is done in winter please don't spill water where people walk because it will freeze and people may slip.
Materials: 1 large bucket of water 3 containers: container 1 and 2 hold the same amount, but are of different shape, container 3 holds less than container 1
Lesson: Fill container 1 with water from the bucket, have students first compare the size of the two containers then have them guess if container 3 will hold less, more, or the same. Fill container 3 to learn the answer
Return all water to the bucket. Repeat part 1, but use container 2 for the discussion. Fill container 2 to learn the answer.
Cross Curriculum: Primary Science Unit Sand and Water
After any lesson I allow time for explore play. During explore play I was cleaning up and noticed container 2 was missing. One student had taken it and the bucket to water the nearby trees!
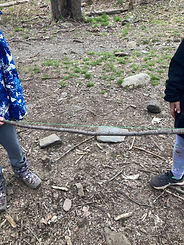
On their own students figured out how to determine which rock is heavier.


After the exercise on measuring an object in nature, the class organically worked together to measure the height of a tree! So much mental and social health here!
Click here for a treetastic lesson on measuring the surface area of a tree! Grade 8/9 outcomes
Length, Width, Perimeter, Area, Circumference
Part I
Before measuring objects outside students will need to learn how to use and read a ruler. This can be taught outside. Gather in a circle with the student(s) holding a ruler. Teach the lesson as you would inside, but you are outside so the students mental health has increased and their social and academic skills have increased. Good job you!
Part II
My students have had fun with measuring objects outdoors! Any grade level no matter if you are measuring the length, width, or height of an object or its perimeter, area, or circumference these lessons can be done outside using nature or man made objects. I use tape measurements for perimeter, and circumference. I use straight rulers for length, width, and height, and area. I use math manipulatives for younger grades (how many blocks long is this stick?). If you have students measure objects found in nature this also teaches approximation as most objects in nature will not be exact. If you do not have nature, student could measure objects on the playground or lines on a court or a fence.
Circumference could be measured by a tape measure going around a tree, a tunnel on the playground, or maybe a neighbour to the school would allow you to measure the circumference of their tree. Please ask permission first.

Referents
I co-taught this lesson. Perhaps if you are unsure of teaching outdoors a colleague and you could co-teach to support each other in this new pedagogy. We gathered outside in a circle to discuss what is a referent. We then had students bring us objects close to the required referent, 1cm and then 1 metre. The teacher and I added in making all their 1cm referrents into an array to add that to the learning.

Find something about 1cm in length and width
Find a stick about 1 metre long

Use your 1 metre long sticks to make
a 1 metre square. Challenge - have your students try to make a 1 metre cube. This promotoes social skills of working together.

Extra: Have students in groups make an array of their 1cm objects to bring in that language, visual, and real life example
Time
Part I
Have students with your guidance create an analog clock. Please see the photgrahps for more details. Call out a time and have two students at a time stand next to the correct time. One student is the hour hand and the other student is the minute hand. While the others watch to make sure they had the same answer in their mind. If you do not have nature students can draw a clock on concrete court using chalk. If this lesson is done with an older class the analog clock could use the 24 hours system. Or a younger and older class could do this with the 24 hour numbers next to the 12, 3, 6, and 9.

Two sticks, one shorter than the other make the hour and minute hand. The student in the middle creates a time. That student picks someone to tell what time it is and then the student that correctly states the time goes in the middle.
Tip: the hour "hand" could be coloured with chalk on the tip of the stick to help remind students which one is the hour clock.

I use 12, 3, 6, and 9 on paper for visual anchors of the clock. In between the numbers there are 14 rocks to mark the minutes.
When we went out to create and learn about an analog clock there was a pile of leaves. The students all played to together to burry one student and toss leaves up in the air afterwards. So much mental and social health!
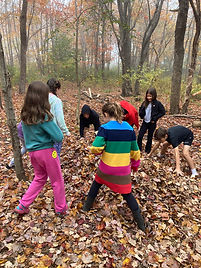


"I was in the green zone the whole time outside!"

Angles
Part I
Teach, while outdoors various angles and how to use a protractor.
Part II
Have students bring you objects that they form into a right angle, acute angle, and an obtuse angle. Afterwards have them use the protractor to meausre angles located in nature! One student discovered pine needles grew at angles!
Here are specific jobs that use a protractor: